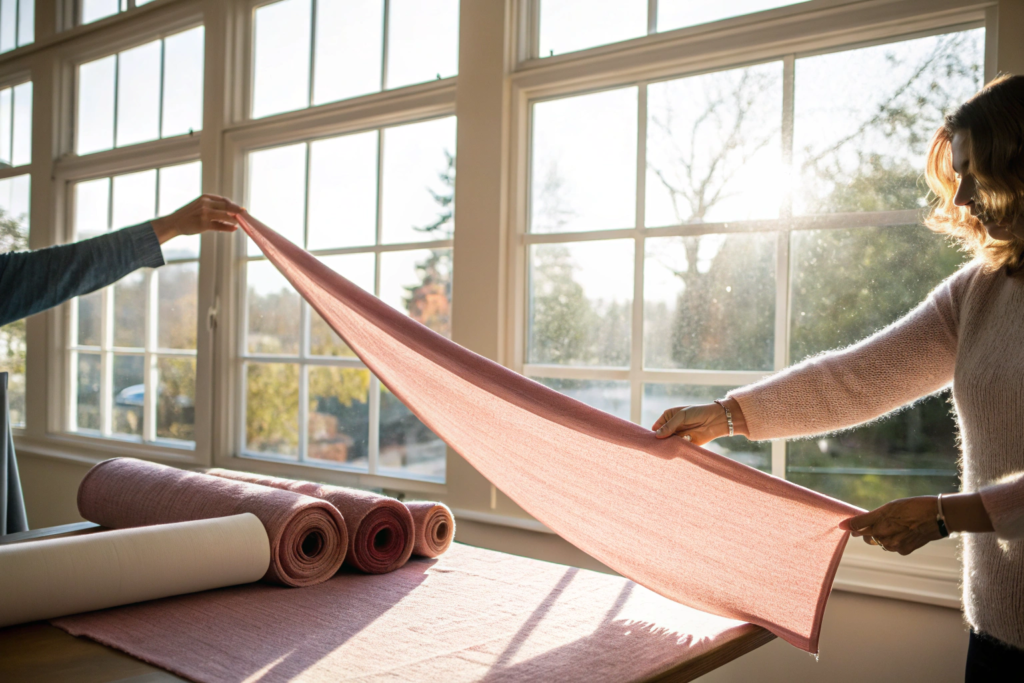
You open the shipping container. The knit fabric rolls look perfect. The color matches your approved lab dip under the warehouse lights. You sign off on the QC report and release payment. Two weeks later, your cutting team spreads the fabric on the cutting table under bright, color-corrected tubes, and suddenly you see them—subtle horizontal stripes, like faint shadows running across the width, repeating every few inches. Your stomach drops. That is barre. You just bought 5,000 meters of defective knit fabric, and the defect was invisible under normal warehouse lighting. I have seen this exact scene play out more times than I can count. Barre marks are the most insidious defect in knitted textiles because they hide in the shadows, only revealing themselves under the right angle of light, and by the time you spot them, the fabric is already cut, sewn, and impossible to salvage.
Barre is not a stain or a hole. You cannot wash it out. It is a structural irregularity in the knit—a periodic, repetitive visual stripe caused by variations in yarn tension, yarn thickness, dye uptake, or knitting machine settings across the width of the fabric tube or open-width roll. The human eye is incredibly sensitive to repeating patterns, and even a slight, regular light-dark variation triggers a perception of "stripes" that ruin the solid-color appearance. At Shanghai Fumao, I treat barre not as a final inspection checkbox but as a process-control discipline that begins at the yarn spinning mill and continues through every stage of knitting, dyeing, and finishing. But I also know that buyers need a practical, in-the-field method to screen for barre when they cannot access a full laboratory. That is exactly what I am going to teach you today.
My goal here is to turn you into a barre-detection machine. I will explain what physically causes those annoying stripes, give you a simple four-step daylight inspection method you can do with just a window and your hands, and then dive into how yarn quality and knitting tension create barre before you ever see the finished roll. I will also share the laboratory-grade verification methods we use in our CNAS lab so you know what to demand from a professional QC report. Barre is not something you just "accept as a knit characteristic." It is a measurable, controllable, and rejectable defect when it exceeds the tolerance threshold.
What Causes Those Annoying Horizontal Stripes in Knitted Fabric?
Barre marks in knit fabric are almost always caused by one of three things: yarn count variation, dye uptake variation, or feed tension variation on the knitting machine. Yarn count variation means the yarn itself is slightly thicker in some sections and thinner in others, even within the same cone. When that yarn is knitted into a continuous fabric tube, the thicker sections create a tighter stitch, which reflects light differently than the thinner sections. The result is a visual stripe. Dye uptake variation occurs when the yarn has been unevenly pre-treated or when the polymer structure of the synthetic filament is inconsistent, causing certain sections of yarn to absorb more dye than others. The stripe appears only after the dye bath, which is particularly cruel—you knit a perfectly uniform greige fabric, dye it, and suddenly barre leaps out. Feed tension variation is purely mechanical: the knitting machine has multiple yarn feeders around the cylinder, and if one feeder is set to a slightly different tension than the others, every revolution of the machine produces a slightly different stitch tightness. This creates a barre pattern that repeats at the exact circumference interval of the knitting machine, which is the fingerprint of a mechanical cause.
I had a specific case in 2023 that still sits with me as a textbook barre diagnosis. A Canadian athleisure brand ordered 8,000 meters of a single-jersey cotton-spandex knit from us for a leggings program. The greige inspection was clean. The dyeing lab dip was approved. The bulk dyeing was a charcoal melange, which is particularly unforgiving because dark colors amplify any light-reflective variations. When we did the final inspection under our 6500K light table, we spotted a faint, periodic barre repeating every 1.2 meters. I knew immediately—1.2 meters is the circumference of our 34-inch diameter knitting machine cylinder. The problem was not the yarn. The problem was not the dye. The problem was a single errant yarn feeder on the knitting machine that had a worn tension spring, causing a 3-gram difference in feed tension that translated into a micro-variation in stitch length. We replaced the spring, re-knitted the batch, and the barre disappeared. This is why I tell my clients: barre is not a mystery; it is a mechanical or chemical cause with a logical fingerprint. You just have to learn to read the fingerprint.
Is Barre a Dyeing Defect or a Yarn Manufacturing Problem?
I get this question constantly, and the answer determines who is responsible for the cost of the rejected lot. Barre can originate from either source, and the diagnostic skill is in distinguishing physical barre from chemical barre. Physical barre is caused by yarn count variation or knitting tension variation. You can detect physical barre on the greige fabric before dyeing by stretching the fabric over a light table and looking for repeating density variations. If the stripe is visible in the greige, it is a yarn or knitting problem, and the knitter or spinner is responsible. Chemical barre—also called dye-barre—is invisible in the greige and appears only after the dye bath. It is caused by differences in dye affinity across the yarn. This can happen when a synthetic filament yarn has uneven draw ratios during the melt-spinning process, or when cotton fibers from different bales with different maturity levels are blended inconsistently. The dye molecules bind more or less to the variable sections, and the stripe emerges.
I had a memorable dispute resolution with a European fast-fashion retailer in 2022. They received 12,000 meters of a viscose-spandex single jersey in a deep burgundy color, and the barre was severe—visible even under dim retail display lighting. Their QC department blamed our dyeing house. I flew to their inspection facility in Romania with my head dyer and a portable light box. We took a one-meter sample of the finished fabric and a one-meter sample of the retained greige fabric from the same batch. We stretched both over the light table side by side. The greige was perfectly uniform—no stripe pattern whatsoever. The stripe appeared only in the dyed fabric. This exonerated the knitting process and pointed directly at the viscose yarn’s dye affinity variability. We traced the issue back to the yarn supplier, who had blended viscose staple fibers from two different production lines with slightly different molecular chain lengths, causing differential dye uptake. The yarn supplier accepted the claim, and we re-produced the order with a new, single-lot yarn batch. The lesson: always keep retained greige samples. They are your forensic evidence when barre appears after dyeing.
How Do Feed Tension Differences on Circular Knitting Machines Create Repeating Barre?
The circular knitting machine is a beautiful piece of engineering, but it is also a democracy of tension—every yarn feeder must deliver the exact same tension as its neighbors, or the fabric rebels by displaying stripes. On a typical single-jersey circular machine, there are 60 to 90 yarn feeders arranged around the cylinder. Each feeder has a tension device, usually a disk or a capstan-type tensioner, that applies a controlled friction force to the yarn as it unwinds from the cone and feeds into the knitting zone. The knitting needles pull the yarn into loops, and the size of each loop—the stitch length—is directly governed by the incoming yarn tension. If one feeder is set to 4 grams of tension and the adjacent feeder is set to 5 grams, the 5-gram feeder produces a slightly tighter, smaller stitch. That tighter stitch reflects light differently than the looser stitch next to it because the yarn lies at a slightly different angle relative to the fabric surface. Multiply this microscopic difference over thousands of courses, and the human eye integrates it into a visible stripe.
The stripe spacing is the diagnostic key. If the barre pattern repeats at exactly the circumference of the machine—typically 26 to 36 inches for body-size machines—then the cause is a single feeder error. One revolution of the machine equals one repeat of the defect. If the barre repeats at half the circumference, the cause might be two opposing feeders with a symmetric tension offset. If it repeats at an irregular interval, the cause is likely a faulty yarn package that was spliced in at a random position. At Shanghai Fumao, our knitting department uses a digital tension meter to calibrate every feeder on every machine at the start of each shift. The tolerance is plus or minus 0.5 grams across all feeders. We document the readings on a shift log, and if any feeder drifts outside that tolerance during the run, the machine stops automatically via a yarn break sensor. Our clients do not see these logs, but they are the reason our knit fabrics ship with a barre defect rate below 0.3% of inspected rolls. The discipline is in the measurement.
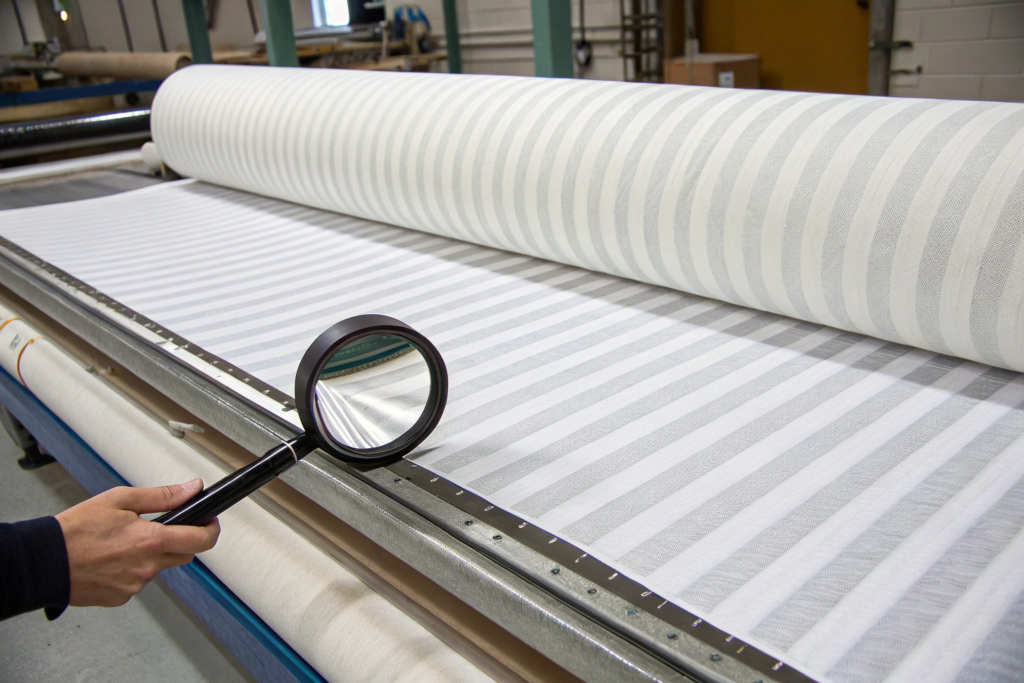
What Is the Simple Four-Step Daylight Inspection Method for Barre Detection?
You do not need a $5,000 light table to catch barre. You need a window, your hands, and a disciplined four-step sequence that takes about three minutes per roll. I taught this method to a group of independent fashion designers at a workshop in 2024, and the feedback was immediate: "Why did no one teach us this in fashion school?" The principle is that barre marks are low-contrast, directional, and periodic. They hide under diffuse, flat lighting—exactly the kind of lighting found in most warehouses and offices. They reveal themselves under collimated, directional lighting at a specific viewing angle range. Daylight is collimated light from a single, distant source. A north-facing window is ideal because the light is bright but diffuse, without harsh shadows. Stand at about a two-meter distance from the window for the best angle-to-illuminance ratio.
Here is the exact four-step method.
Step one: Vertical roll scan. Roll the knit fabric onto a tube or keep it in its rolled form. Hold the roll vertically at arm’s length, parallel to your body. Slowly rotate the roll while scanning the outer layer under the window light. Barre marks on a vertical roll appear as faint vertical bands—circumferential stripes that wrap around the roll. Mark any suspicious bands with a small piece of masking tape.
Step two: Tensioned length examination. Unroll approximately two meters of fabric. Grip the fabric at both selvedge edges with your hands, stretching it gently—about 5% to 10% extension, just enough to remove any relaxed wrinkles but not enough to distort the knit structure. Hold the stretched fabric in front of the window at chest height. Tilt the fabric slowly from vertical to near-horizontal, watching the surface as the reflection angle changes. The optimal detection angle is typically 20 to 30 degrees from the plane of the fabric—almost parallel to the fabric surface. Barre marks will "blink" into visibility as the angle sweeps through the sweet spot. When the angle is too steep, they disappear. When it is too shallow, the fabric surface reflects glare and washes out the contrast.
Step three: Rotated re-check. With the fabric still under tension, rotate it 90 degrees horizontally so you are viewing it from a different incident light direction. Barre marks can be highly directional, and changing the viewing axis often reveals stripes that were invisible in the previous orientation. Repeat the tilt sweep in this new orientation.
Step four: Flat table inspection. Lay the fabric flat on a table near the window, but stand back and view it from a low angle, almost crouching to table height. This simulates how the fabric will look when spread on a cutting table. The combination of flat lay and low-angle viewing often reveals a subtle barre that was not caught in the tensioned step because tensioned fabric can sometimes mask low-contrast physical variations.
Why Does Angled Lighting Reveal Barre Marks That Flat Light Hides?
The physics here is simple but not obvious. Barre marks are not color differences; they are surface geometry differences. A tighter stitch and a looser stitch in the same yarn and same dye lot are exactly the same color. A spectrophotometer measuring the fabric straight-on, with the light source perpendicular to the surface, will record identical Lab* values for both areas. What differs is the micro-topography—the three-dimensional surface angle of the yarn loops relative to the fabric plane. A tighter stitch creates a flatter, more parallel yarn surface. A looser stitch creates a slightly more textured, angled yarn surface. These two surfaces reflect light in different directions. Under flat, diffuse lighting—like fluorescent tubes with a diffuser panel—light hits the fabric from every angle simultaneously, and the reflected light is scrambled into a uniform wash. The geometric difference is optically averaged out.
Under directional, angled lighting, the difference emerges. Imagine two small mirrors, one tilted at 15 degrees and one tilted at 25 degrees. Shine a flashlight at both from the same direction. One mirror will reflect the beam directly to your eye, and the other will bounce it off at a different angle, appearing darker. The tighter and looser stitches are acting like millions of these tilted micro-mirrors. When you tilt the fabric and view it at a shallow angle, you are selecting for the specific reflection angle that maximizes the contrast between the two stitch geometries. The barre "pops." This is also why barre is often more visible in dark colors like navy, charcoal, and black—the high absorption of the dark dye reduces scattered light, amplifying the relative contribution of the direct surface reflection. A black fabric with barre is the most unforgiving combination in textiles. My QC team inspects every dark solid knit under a dedicated grazing-angle light rig that simulates the worst-case retail display lighting.
Can a Smartphone Flashlight Substitute for Professional Inspection Equipment in the Field?
Yes, but only as a screening tool, not as a final pass-fail decider. A smartphone LED flashlight emits a small, intense, relatively collimated beam that approximates the directional light of a professional inspection lamp. The technique is different from the daylight method. Instead of standing by a window, you work in a darkened room. Lay the fabric flat on a table. Turn off the overhead lights. Hold the phone flashlight at a height of about 12 to 18 inches above the fabric surface, and angle the beam so it rakes across the fabric at a 15 to 20-degree grazing angle. Crouch down and view the fabric from the opposite side, looking toward the light source but keeping your eye line also at a grazing angle. This creates a "light-glancing" condition that is extremely sensitive to surface topography variations. Barre marks that are invisible under daylight will often become starkly visible under this raking flashlight beam.
The limitation is coverage area. A phone flashlight illuminates a relatively small circle, so you must methodically scan the entire width and length of the fabric, moving the light slowly and watching for stripe patterns. This is feasible for spot-checking a few rolls but impractical for 100% inspection of a container-load. I recommend the phone flashlight method for buyers visiting a supplier’s warehouse for a quick pre-shipment check, or for receiving inspection at your own facility when the full light table is occupied. It is also a powerful negotiation tool. I have seen a buyer pull out a phone flashlight at a supplier’s showroom, rake the fabric, and reveal barre that the supplier was hoping nobody would notice. The room goes quiet, and the price often drops. Use the tool. But for final acceptance sampling, demand proper light table inspection with documented AQL sampling and a report. The phone flashlight is a screening device, not a legal QC instrument.
How Does Yarn Quality Control Prevent Barre Before Knitting Begins?
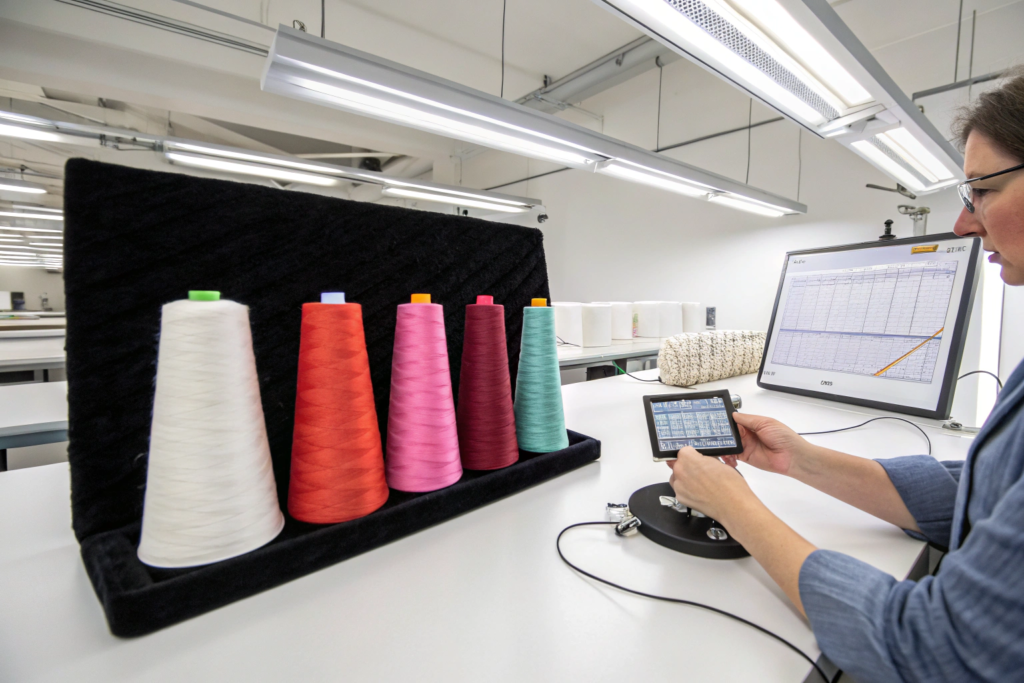
The battle against barre is won or lost before the first stitch is knitted. Yarn is the DNA of the knit, and if the yarn carries variability in it—thickness variation, hairiness variation, blend unevenness, or internal stress differences—that variability will express itself in the finished fabric. At Shanghai Fumao, we test every incoming yarn lot for evenness before it enters the knitting department. The primary instrument is the Uster evenness tester, which passes the yarn between two capacitor plates and measures the mass variation per unit length at a sampling rate of 8 millimeters. The machine outputs a spectrogram—a graphical plot that shows the frequency distribution of mass variations along the yarn length. A healthy spectrogram shows a gentle, random background noise. A spectrogram that shows a sharp, isolated peak at a specific wavelength indicates a periodic defect in the spinning process, often caused by a damaged roller or an eccentric spindle on the spinning frame. That periodic defect will translate directly into a periodic barre in the knitted fabric.
I have a rule in our knitting mill: no cone of yarn enters the knitting room without a Uster spectrogram attached to the batch lot number. If the spectrogram shows a periodic peak with an amplitude greater than 15% above the average mass variation, the entire yarn lot is rejected and returned to the spinner. This is an expensive quality gate—it costs us time and money to test every lot, and occasionally we reject yarn we have already paid for. But it is exponentially cheaper than knitting 10,000 meters of fabric, dyeing it, and then discovering barre. A yarn rejection costs us a few hundred dollars in logistics and delay. A fabric rejection costs tens of thousands, plus the relationship damage with the client. The arithmetic is simple.
What Is Yarn Evenness Testing and How Does It Predict Knit Barre?
Yarn evenness testing measures the short-term mass variation along a continuous length of yarn. The Uster tester pulls the yarn through a capacitive sensor at a constant speed, typically 200 to 400 meters per minute. The sensor measures the dielectric constant of the material passing through it, which is directly proportional to the mass of fiber inside the sensing zone. If the yarn has a thick spot—a section where more fibers are packed into the cross-section—the capacitance increases. If it has a thin spot, the capacitance drops. The machine records thousands of these readings per second and calculates the Coefficient of Mass Variation, or CVm%. A CVm% below 12 is considered good for cotton yarns; below 10 is excellent. But the raw CVm% is not enough to predict barre. Barre prediction requires analyzing the spectrogram for periodic faults.
A periodic fault is a recurring thick-thin pattern at a regular wavelength. In the spectrogram, these appear as a spike, or a "chimney," rising above the normal background curve. The wavelength of the chimney tells you exactly where the fault originated in the spinning process. A chimney at 8 to 10 centimeters wavelength usually indicates a drafting roller problem on the spinning frame—a flat spot on the roller that creates a regular slip-and-grab pattern. A chimney at 2 to 4 meters wavelength suggests a problem in the roving frame, further back in the process. The key ratio is the periodic fault amplitude: the height of the chimney relative to the background level. An amplitude ratio above 1.5 is a yellow flag; above 2.0 is a red flag that will almost certainly produce visible barre in a solid-color knit, especially in finer yarn counts and tighter gauge knits. I share this data with my clients. If they specify a yarn that tests at a 1.6 amplitude ratio, I flag it for them and offer the choice: proceed with a higher barre risk acceptance, or switch to a higher-quality yarn lot with a 1.2 amplitude ratio and a slight cost premium. Informed choice beats surprised rejection every time.
How Do Spinning Defects Like Periodic Faults Translate Into Visible Stripes?
Think of the knitting machine as a magnifying glass for yarn irregularities. A periodic fault that creates a 0.5% linear density variation in the yarn—barely noticeable to the naked eye on a cone—can produce a 2% to 3% stitch length variation in the fabric. That stitch variation translates into a local fabric density variation, which changes the light reflectance, and suddenly the stripe is visible across the entire width of the fabric. The magnification happens because the knitting process integrates the yarn fault over hundreds of wales. A single faulty meter of yarn from the spinning frame can produce dozens of knitted courses, and because the machine feeds continuously from the same cone, the periodic fault repeats course after course at a fixed interval. The eye detects this repetitive pattern instantly.
I did a controlled experiment with my knitting team in 2024 to demonstrate this to a group of visiting textile engineering students. We took two identical cones of 40/1 combed cotton yarn from the same spinner. One cone had a verified periodic fault at an 8-centimeter wavelength with a 1.8 amplitude ratio. The other was a control cone with a 1.1 amplitude ratio. We knitted both cones on the same machine, same settings, same tension, into two separate tubes of single jersey. The control fabric was visually perfect, uniformly smooth. The faulty-yarn fabric showed a distinct, rhythmic barre repeating at exactly the course spacing corresponding to the 8-centimeter yarn fault wavelength. The students were stunned by how clearly the invisible yarn defect manifested in the finished fabric. I keep both samples in my training archive as a permanent exhibit. The lesson is that barre inspection does not begin at the fabric stage; it begins at the yarn evenness tester. If your supplier cannot show you the Uster spectrogram for the yarn lot they used in your knit, you are buying unverified quality.
What Laboratory Verification Methods Confirm Barre Severity Objectively?
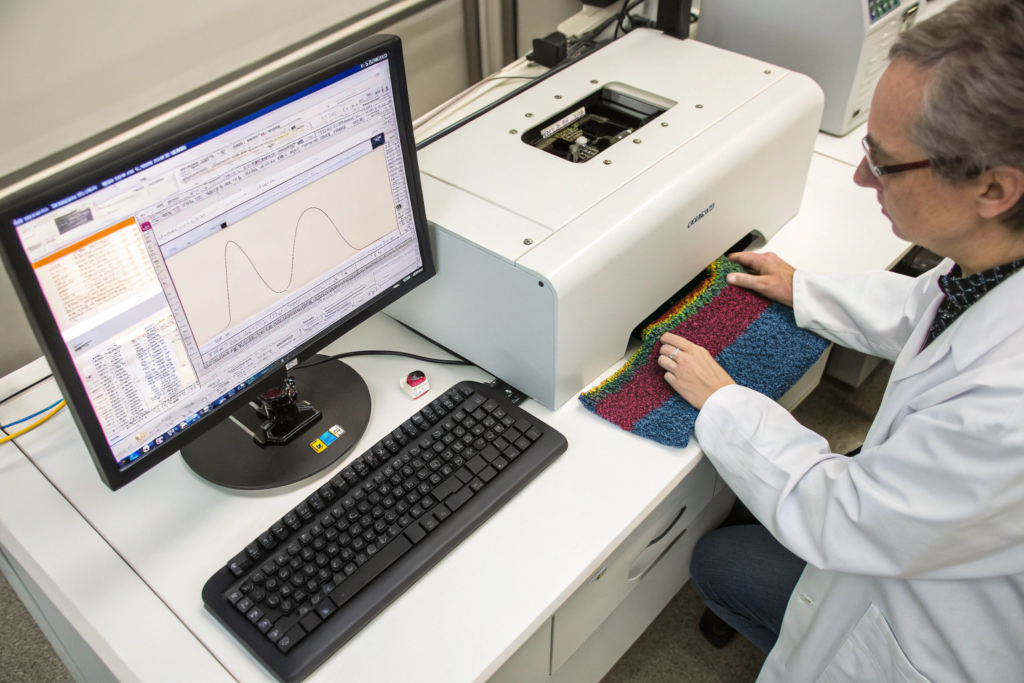
Subjective visual inspection catches obvious barre, but only instrument-based laboratory verification gives you a defensible, quantitative pass-fail criterion that stands up in a commercial dispute. At Shanghai Fumao, we use two primary lab methods for barre verification: spectrophotometric reflectance analysis and digital image analysis. The spectrophotometric method quantifies what the dye house contributed—or failed to contribute—to the barre. The digital image analysis method quantifies what the knitting and yarn contributed. Running both tests on a disputed fabric gives you a complete forensic profile that identifies whether the barre is primarily chemical, physical, or a combination. This is not academic; this is the data that determines who pays for the rejected lot.
The spectrophotometric method uses a benchtop spectrophotometer to measure the reflectance values across the visible spectrum at multiple points along the fabric, systematically alternating between the visually "lighter" stripe zones and the visually "darker" stripe zones. The instrument calculates the Delta E (CIELAB color difference) between these adjacent zones. A Delta E value below 0.5 is imperceptible to the human eye. A Delta E between 0.5 and 1.0 is perceptible only under optimal viewing conditions—angled light, dark colors, critical observation. A Delta E above 1.0 is a visible color difference under normal retail lighting. For dark solid colors like black or navy, my internal standard for barre rejection is a Delta E of 0.8 or greater between adjacent stripe zones, which is stricter than the generic 1.0 threshold because dark colors amplify barre visibility. For light colors and heathers, the threshold extends to 1.0. These numbers are written into our QC specification and are auditable by any third-party lab.
How Does a Spectrophotometer Quantify Barre Into an Objective Pass/Fail Grade?
The spectrophotometer measures the percentage of light reflected from the fabric surface at each wavelength from 400 to 700 nanometers—the visible spectrum. The measurement is taken under a standardized illuminant, typically D65 daylight, and a standardized observer angle of 10 degrees. The instrument first measures a white calibration tile to establish 100% reflectance, then measures the fabric at a specific point and generates a reflectance curve. The curve for the "lighter" barre stripe and the "darker" barre stripe will have the same general shape—they are the same color, after all—but the lighter stripe will have a slightly higher reflectance across all wavelengths. The Delta E calculation integrates this reflectance difference across the full visible spectrum, weighted by the sensitivity of the human eye to different wavelengths.
To get a statistically valid barre grade, you cannot just measure one light spot and one dark spot. You must take a systematic set of measurements. I use a measurement grid of ten points: five on the light stripe and five on the dark stripe, alternating across the fabric width at a fixed interval. The spectrophotometer calculates the average Lab* coordinates for the light set and the dark set, then computes the Delta E between those two average coordinates. This grid method compensates for local noise in the fabric surface and delivers a robust, reproducible number. I have sent clients a one-page barre verification report that shows the measurement grid, the individual readings, the averaged coordinates, and the final Delta E value with a clear PASS or FAIL stamp. When a US retailer’s QC department tried to reject a batch of our modal-spandex jersey as having "unacceptable barre," we pulled our archived verification report for that dye lot, showed a Delta E of 0.55 on the measurement grid, and proved the barre was below the AQL 2.5 perception threshold. The rejection was overturned, and the goods were accepted. Objective data wins arguments.
What Is the Standard AQL Acceptance Level for Barre Marks in Premium Knitwear?
Barre is classified differently from standard point-based defects like holes or stains. Under the most widely used textile inspection standards—the American Four-Point System and the 10-Point System—barre is not assigned a point value per occurrence. It is treated as a "critical defect" or a "major defect" depending on severity, because a single barre occurrence can affect an entire roll, not just a localized area. The AQL (Acceptable Quality Level) sampling plan under ANSI/ASQ Z1.4 typically designates barre as a Major defect with an AQL of 2.5 or 1.5 for premium knitwear, meaning the acceptable defect rate in the sample is 2.5% or 1.5% of inspected units. A barre defect on a roll makes that entire roll a defective unit since the defect is continuous along the roll length.
For premium and luxury knitwear programs, I work to a tighter internal standard: AQL 1.0 for barre as a standalone critical visual defect. This means for a lot size of 1,200 rolls, we inspect 32 rolls per the sampling plan, and we accept the lot only if zero rolls show barre defects. If one roll shows barre, we escalate to a tightened inspection of double the sample size. If the tightened inspection finds another occurrence, the entire lot is failed and re-inspected 100% under the angled light method. This rigorous standard is necessary because premium knitwear customers have extremely low tolerance for visual non-uniformity in solid-color garments. I had a European luxury basics brand audit our QC system in 2023 specifically on barre control. They brought their own lighting equipment and re-inspected 50 random rolls from a ready-to-ship order of Supima cotton interlock. Zero barre detected. The brand’s quality director later told me our AQL 1.0 barre standard was the strictest she had seen in a Chinese mill. That is the reputation I work to maintain. It is achieved not by obsessive final inspection but by the yarn evenness testing, knitting tension calibration, and dye process control that systematically prevent barre from forming in the first place.
Conclusion
Barre marks are not an inevitable characteristic of knitted fabric; they are a measurable, preventable, and rejectable manufacturing defect with a specific physical or chemical cause. I have walked you through the root causes—yarn count variation, dye affinity variability, and knitting feed tension differences—and given you a practical four-step daylight inspection method you can execute with just a window and your hands. We went upstream to the yarn evenness tester and the Uster spectrogram, showing how barre is predicted before knitting even begins, and then we went into the laboratory with spectrophotometer measurements and AQL sampling plans that provide objective, legally defensible pass-fail criteria.
Twenty years of producing knit fabrics has taught me that barre control is a factory culture, not a final inspection procedure. It lives in the discipline of calibrating feeder tensions at shift start, in the refusal to accept yarn lots with periodic fault chimneys above 1.5 amplitude, and in the willingness to fail an entire batch at AQL 1.0 and re-run it correctly rather than shipping marginal quality and hoping the customer does not notice under warehouse lighting. The customer always notices eventually—on the cutting table, on the retail rack, or on the customer’s body under changing room lights.
If you are sourcing knit fabrics and want a supplier who treats barre as a process-control discipline rather than a post-hoc excuse, I am ready to talk. Our knitting department, yarn testing lab, and CNAS-accredited inspection team are integrated under one roof in Keqiao, and I stand behind every roll we ship. Reach out to our Business Director, Elaine, at elaine@fumaoclothing.com. Send her your knit fabric specification, your performance requirements, and your barre tolerance standard. She will provide our barre control process documentation and a sample lot for your own daylight inspection verification. Let us knit your fabric so cleanly that barre never makes it to your cutting table.