Let me tell you where most knit fabric deals go off the rails. It's not the price. It's not the color. It's the Stretch. I can't count the number of panicked emails I've gotten on a Monday morning. "Elaine, the jersey arrived. The color is perfect. But we cut 500 units and the necklines are sagging like a old sock." Or, "Elaine, the leggings fabric is so tight it's see-through. We can't sell this." And every single time, I ask the same question: "Did you send me a QC Checklist with the PO?" The answer is almost always silence.
Look, woven fabrics are relatively straightforward. You check the width, the weight, the weave, and the color. Wovens are like a brick wall—stable and predictable. Knit fabrics are different. They're alive. They're a series of interlocking loops. They want to curl at the edges. They want to shrink when you wash them. They want to stretch out and stay stretched out if you don't engineer the yarn correctly. A knit fabric QC checklist isn't just a "nice to have." It's the only thing standing between you and a container full of unsellable t-shirts or yoga pants.
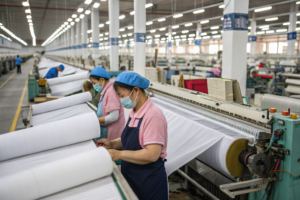
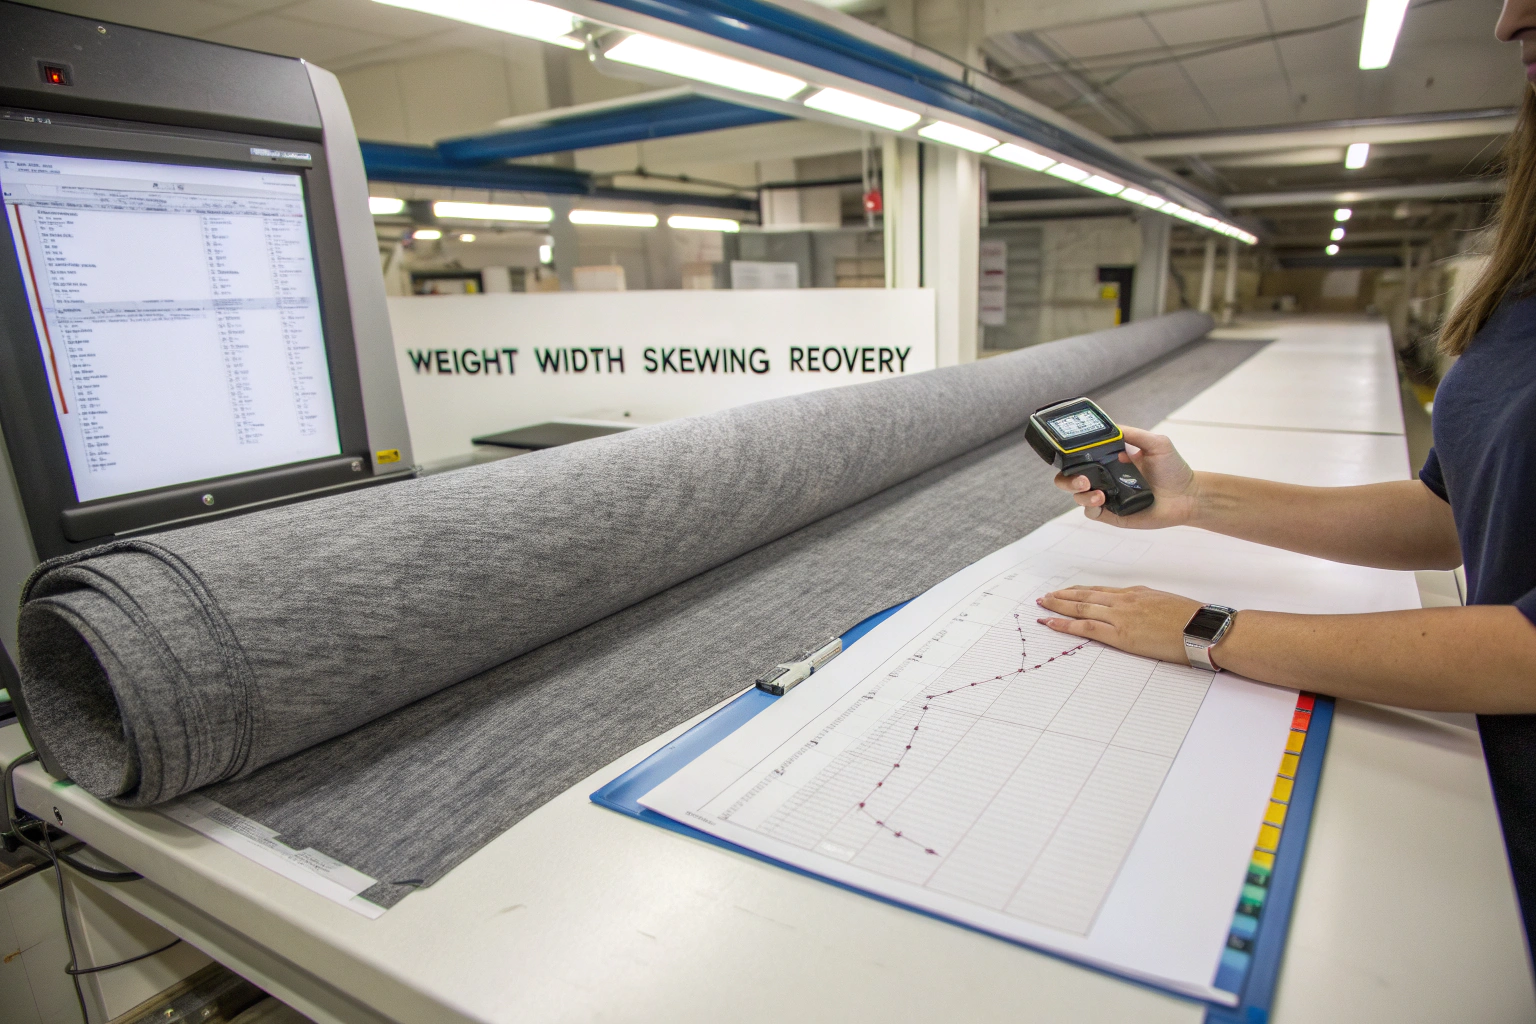
At Shanghai Fumao, we produce thousands of tons of knit fabric every year—single jersey, interlock, rib, fleece, you name it. We have our own internal standards that we've honed over 20 years. But I'm going to give you the exact same checklist framework I give my private label clients. This isn't about trusting the supplier. It's about aligning expectations. It's about speaking the same language. So when I say "Good Recovery," you know exactly what numbers I'm talking about. Let's build a checklist that catches the silent killers of knit garments: skewing, poor recovery, and unstable shrinkage.
Why Is Testing Stretch and Recovery Critical for Knits?
If you only check one thing on a knit fabric—just one—make it Stretch and Recovery. You can fix a slight shade issue with smart cutting. You can fix width variance by adjusting your marker. But if the fabric doesn't snap back after you pull it, you have Dead Fabric. There is no fix for that. You cannot un-cut a garment. You cannot un-sew a seam. You just eat the loss.
The reason this is so specific to knits is the loop structure. In a woven fabric, the yarns are straight. In a knit, the yarns are curved. That curve acts like a tiny spring. When you pull the fabric, the loops straighten out. If the yarn has good Elastic Memory, it wants to curl back up into that loop shape. If the yarn is cheap or the knitting tension is wrong, it stays straightened out. That's bagging. That's sagging.
I want you to think about the end-use of the garment. A fabric for a Slim Fit Dress needs different stretch specs than a fabric for a Loose Fit Hoodie. And here's a dirty secret: Many factories will test stretch only in the length direction. They'll ignore the width. That's a trap. Let's dig into the two tests that separate a professional buyer from an amateur.
How to Perform a Manual Stretch Test for Fabric Recovery?
You don't need a $20,000 Instron machine for this. You need a ruler, a couple of pins, and a marker. This is a test you can do in your studio, and it's the same test I have my QC team do on every single batch of jersey and rib before it leaves the warehouse in Keqiao.
The Manual Recovery Test Protocol (For Spandex/Cotton Blends):
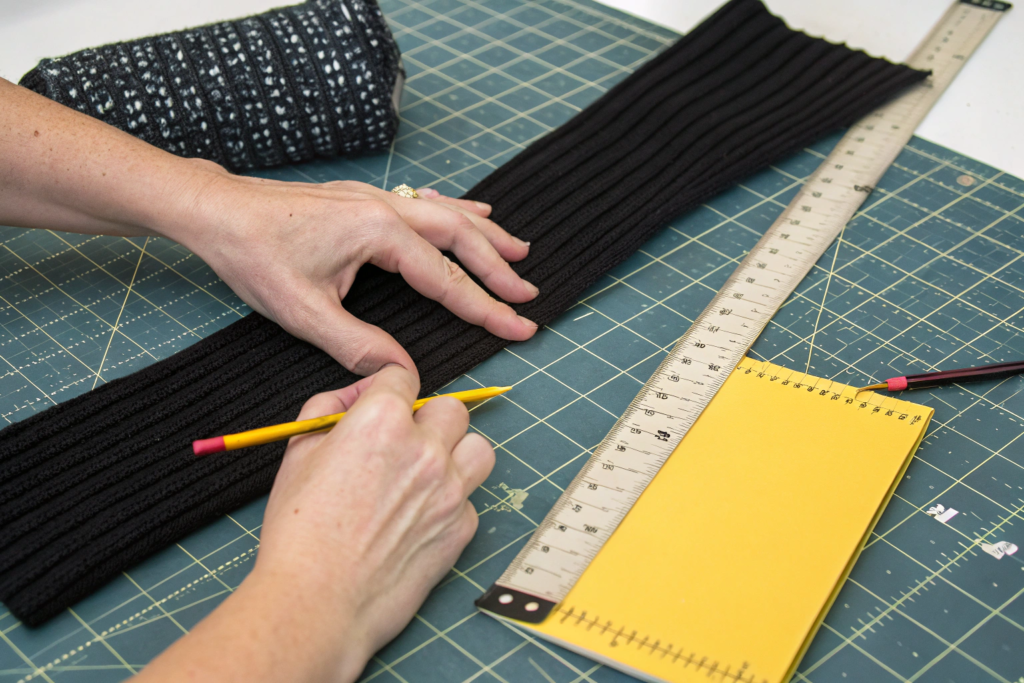
- Cut the Sample: Cut a 10cm x 10cm square (or 4 inches x 4 inches). Do not use the very edge of the roll. The edge is usually tighter or looser. Cut at least 6 inches in from the selvedge.
- Mark the Benchmarks: Using a fabric marker, draw a line exactly 10cm (or 4 inches) long in the Width direction. Draw another line exactly 10cm long in the Length direction. (The direction matters because fabric stretches differently in width than length).
- The Stretch: Hold the fabric at the ends of the line. Stretch it Firmly until you feel the natural "stop"—you're not trying to rip it, but you want to fully extend the loops. Hold that stretch for 10 Seconds.
- The Release: Let it snap back. Lay it flat. Wait 60 Seconds. Do not measure it instantly. Let the fibers relax.
- The Measurement: Measure the distance between the marks now.
- The Math:
Recovery % = (Original Length / Relaxed Length) x 100- Example: You stretched a 4-inch line. After 60 seconds, it measures 4.2 inches.
4.0 / 4.2 = 0.952-> 95.2% Recovery.
Shanghai Fumao Internal Standard:
- Premium Activewear (Lululemon-tier): > 97% Recovery. (That means it only grew 3%).
- Standard Fashion Jersey: > 94% Recovery.
- Reject: < 90% Recovery. (If it stays at 4.5 inches, that's a 12.5% growth—knees and elbows will bag out after an hour of wear).
I had a client in 2023 who was making maternity wear. She needed a super-soft rayon spandex rib. The first sample from another mill had 88% recovery. It was like chewing gum. We adjusted the yarn twist and increased the spandex content by 2%. The next batch hit 96% recovery. Same soft hand, but it held its shape. That's the difference between a return and a re-order. This process aligns with the industry standard, which you can read about in more detail in this guide to ASTM D2594 standard test method for stretch properties of knitted fabrics. For a more hands-on, at-home version, this blog post on how to do a fabric stretch test without special equipment is a great resource.
Why Does Skewing or Twisting Ruin Knit Garment Construction?
(Here's my "Old Man Yells at Cloud" moment.) Skewing is the devil. It's when the wales (the vertical ribs of the knit) don't run straight down the roll. They run at a diagonal. If you cut a t-shirt body on a skewed fabric, the side seams will twist around to the front of the body after you wash it. You've seen this. You buy a cheap t-shirt, wash it once, and the seam is suddenly under your armpit instead of down your side. That's skew.
Skew happens in the dyeing and finishing process. Specifically, when the fabric is running through the Slitting and Drying process. If the tension on the left side of the machine is different from the right side, the loops get pulled into a parallelogram shape. When the fabric is dry, it "sets" in that twisted position. You steam it, you cut it, you sew it. Then the customer washes it. The water releases that tension memory, and the whole garment Torques back to its relaxed, twisted state.
The QC Checklist for Skew:
- Cut a Square: Cut a 20-inch x 20-inch square from the fabric. Make sure your cuts are perfectly perpendicular to the selvedge (use a T-square).
- Mark a Line: Draw a line with a marker exactly parallel to the wale (the visible rib line).
- Wash and Tumble Dry: Do one standard wash/dry cycle as per care label.
- Re-Measure: Lay the square back on the cutting table. Align the bottom edge with the table's grid.
- Measure the Drift: Measure how far the top corner of the line has drifted to the left or right.
Acceptable Tolerance:
- For Yarn-Dyed Stripes: < 3% Skew. (Because the eye sees the stripe misalignment instantly).
- For Solid Colors: < 5% Skew.
We had a large order of striped cotton jersey for a European brand. Our finishing plant pushed the speed too fast on the tenter frame. The skew was 6%. The client caught it on inspection in Italy before cutting. We had to re-wash the entire batch and re-set the skew on the framing machine. It cost us a week and $2,000 in re-processing. But it saved the brand a recall. This is why you check. To get into the technical nitty-gritty, review this article on causes of fabric skew and bowing in knit finishing and how to test for it. And for a visual representation, this explainer on how to measure skew in knitted fabric is very clear.
What Are the Essential Measurements for Knit Fabric Quality?
Now that we've covered the dynamic properties (stretch and twist), let's talk about the static fundamentals. These are the numbers that define whether the fabric matches the spec sheet you signed off on. And here's where I see a huge disconnect between US buyers and Asian mills. The US market talks in Ounces per Square Yard (oz/yd²) . The rest of the world (and 99% of China's knitting machines) works in Grams per Square Meter (GSM) .
You need to know both. And you need to know the Usable Width vs. the Total Width. Let's break down the three core measurements you must check on every single roll: Weight, Width, and Shrinkage.
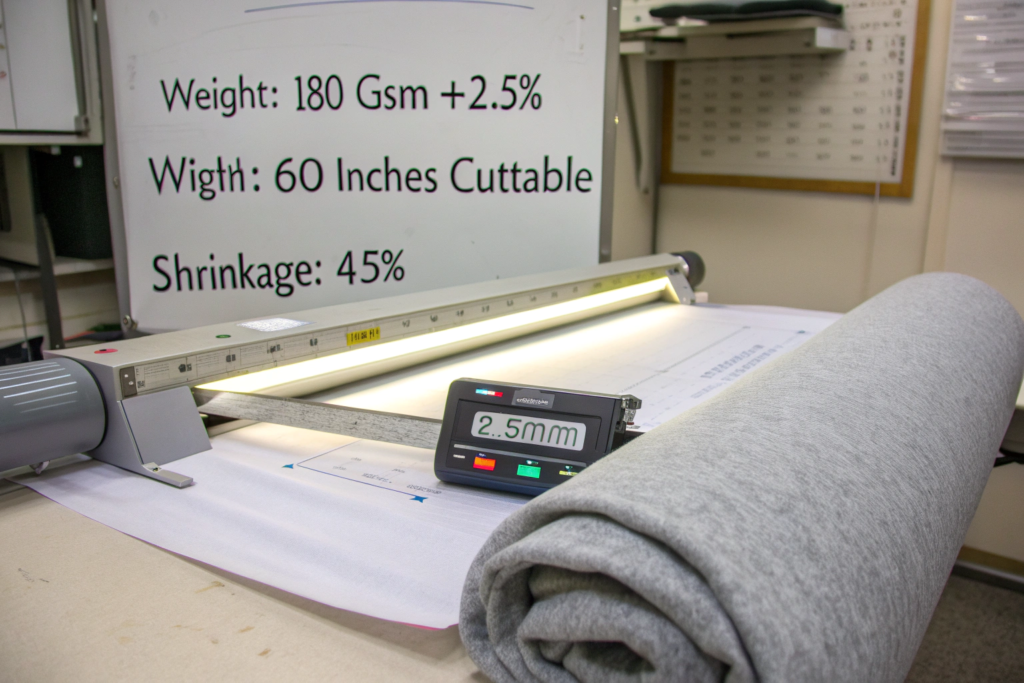
How to Verify Fabric Weight (GSM vs Oz/Yd²) Accurately?
This is the most common bait-and-switch in the industry. You order "180 GSM Jersey." You get a shipment that feels thin and cheap. You weigh it. It's 160 GSM. That's an 11% reduction in fiber. You essentially paid for air. Or rather, you paid for yarn that isn't there.
The Proper Weighing Method (Using a GSM Cutter):
- Tool: Use a GSM Round Cutter. It cuts a perfect circle of fabric with an area of exactly 100 square centimeters. (If you don't have one, you can make a 10cm x 10cm cardboard template and cut with scissors, but it's less accurate).
- Sample Location: Cut 5 samples from different parts of the roll (Left edge, Center, Right edge, Start of roll, End of roll).
- The Scale: Use a digital scale that measures in Grams (g) and goes to two decimal places (0.01g).
- The Math:
- Weight of circle in grams x 100 = GSM.
- Example: Circle weighs 1.82g. GSM = 182.
- Convert to Ounces (if needed):
GSM / 33.906 = Oz/Yd²- Example:
182 / 33.906 = 5.3 oz/yd²
Tolerance: The industry standard is +/- 5% .
- Ordered: 200 GSM. Acceptable Range: 190 - 210 GSM.
I cannot stress this enough: Always check weight after washing (relaxed state). Some mills will stretch the fabric tight on the tenter frame to make it measure wider and thinner (lighter weight). As soon as you steam it or wash it, it relaxes, shrinks in width, and the weight comes back up to its true value. This is called Residual Shrinkage Potential. We pre-shrink all our jersey at Shanghai Fumao with a compaction machine specifically to prevent this surprise. You can buy a GSM cutter relatively cheaply, and this guide explains the difference between GSM and fabric weight testing methods for knit textiles. For a quick conversion cheat sheet, this GSM to Oz converter and explanation of fabric weight tolerances is helpful.
What Are Acceptable Shrinkage Tolerances for Cotton vs Synthetics?
Shrinkage is a fact of life. Fibers swell when wet and contract when dry. But how much is too much? This depends entirely on the Fiber Content.
Let's put the standards we use at our CNAS lab right here on the table. These numbers assume a standard home laundering cycle (Warm Wash / Tumble Dry Medium).
| Fabric Type | Acceptable Length Shrinkage | Acceptable Width Shrinkage | Notes |
|---|---|---|---|
| 100% Cotton Jersey | < 5% - 7% | < 3% - 5% | Cotton shrinks. Period. If you need less, buy Combed Compact Cotton or Pre-Shrunk finish. |
| Cotton/Spandex (95/5) | < 5% | < 4% | Spandex helps recovery but doesn't stop cotton shrinkage entirely. |
| Polyester/Rayon (French Terry) | < 3% | < 2% | Rayon can be tricky. Always test Rayon blends. |
| 100% Polyester (Performance Knit) | < 2% | < 1% | Synthetics are stable unless heat-set incorrectly. |
The Shrinkage Test Protocol:
- Cut a 20" x 20" square. (Larger square = More accurate percentage).
- Mark a 18" x 18" box INSIDE the square. Sew a contrasting thread line along this 18" box. Why? Because the edges of knits curl. The thread line gives you a stable reference to measure.
- Wash and Dry: Follow the care label instructions exactly. If the label says "Cold Wash, Hang Dry," do that. If it says "Tumble Dry Low," do that.
- Measure the Thread Box: Lay the fabric flat without stretching it. Measure the distance between the thread lines.
- Calculate:
Shrinkage % = [(18 - New Measurement) / 18] x 100- Example: New measurement is 17.1 inches.
(18 - 17.1) = 0.9.0.9 / 18 = 0.05. 5% Shrinkage.
I had a client making men's polo shirts from pique knit. He didn't test shrinkage. The first wash, the shirts shrunk 8% in length. A size Large became a size Medium. He had to re-label 3,000 units. Now, we pre-wash a sample of every new pique lot before we ship bulk. It adds 24 hours to the lead time, but it saves thousands in returns. This is the industry bible for the test: AATCC Test Method 135 for dimensional changes of fabrics after home laundering. For a more consumer-friendly version of why this matters, this explainer on how to pre-shrink fabric and why it's necessary for sewing is worth a read.
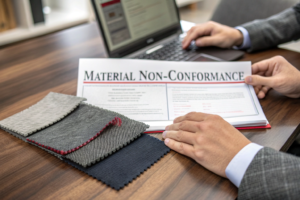
How to Inspect Knit Fabric Surface for Specific Defects?
Alright, the numbers look good. The stretch snaps back. The weight is correct. Now you have to look at the surface. And looking at a knit surface is different from looking at a woven. Woven defects are usually structural breaks in the grid. Knit defects are usually Loop Irregularities. Because the fabric is made of loops, one broken loop can cause a "ladder" that runs down the entire length of the garment. One tight loop creates a permanent horizontal line across the body.
Inspection for knits is about Light. You cannot inspect knit fabric on a solid table with overhead fluorescent lights. You will miss 50% of the defects. You need Transmitted Light (light shining through the fabric) for some defects, and Reflected Light (light shining on the surface) for others. Let's look at two of the most infuriating and common knit-specific issues: Barre and Holes.

What Does Barre or Yarn Variation Look Like in Jersey?
Barre (pronounced "bar-ay") is the bane of my existence. It looks like a Horizontal Streak or a Stripe in the fabric that has nothing to do with the design. It's a physical change in the yarn or the stitch density. You see it most clearly in solid colors, especially shiny fibers like Viscose or Tencel.
What Causes It?
- Yarn Mix-Up: The knitter put a cone of yarn with a slightly different twist level or a different blend ratio on the machine. Even a 2% difference in filament count in polyester will reflect light differently.
- Machine Fault: A needle is slightly bent or a feed finger is dirty. It creates a different size loop in that one course.
- Tension Variation: The yarn tension fluctuated for a few seconds during knitting.
How to Inspect for Barre (The "Reflected Light" Method):
- Stand Back: Do not put your nose to the fabric. Stand 5-6 feet away from the inspection table.
- Look Along the Roll: Pull about 10 yards of fabric off the roll and let it drape.
- Change the Angle: Look at the fabric surface from a low, flat angle. Barre is a Light Reflectance Issue. You will see the horizontal band as a change in sheen or a faint shadow line. If you look straight down, you might miss it.
- Mark It: When you see it, mark the selvedge with a sticker. If the barre repeats every 30 inches, you know it's a mechanical issue with the knitting machine cylinder. The whole roll is likely bad. If it's just one random streak, it might be a yarn splice. You can cut that section out.
We had a run of beautiful modal jersey for a sleepwear brand. It looked flawless under our factory lights. The client received it and under their showroom track lighting (angled spotlights), the barre was visible from across the room. We traced it back to a faulty yarn clearer on the spinning frame. We had to re-knit the lot. Now, we inspect all shiny yarn-dyed knits under a Slanted Light Booth specifically to catch this. This is a technical look at the problem: analyzing causes of barre defects in circular knitted fabrics and how to prevent them. And for a visual reference, this glossary of knitting defects with photos of barre markings is very useful.
How to Check for Holes, Needle Lines, and Drop Stitches?
These are the Catastrophic Defects. A hole in a knit is usually not a rip in the finished fabric. It's a Broken Loop that happened during knitting. Because of the interlocking structure, that broken loop will Run—just like a woman's stocking. If you sew that piece into a garment, the seam might hold for one wear. But after one wash, the yarn will slip, and you'll have a thumb-sized hole.
The Inspection Protocol (The "Transmitted Light" Method):
- Use a Light Table: This is non-negotiable for quality inspection. The fabric passes over a frosted glass panel with lights underneath.
- Watch the Shadow: As the fabric rolls over the light, look for Black Spots or Bright Flashes.
- Black Spot: A thick place or a slub. It blocks the light.
- Bright Flash: A thin place or a Hole. The light pours through.
- Identify the Type:
- Pin Hole: A tiny, single broken filament. Often caused by a burr on the needle. Usually repairable.
- Needle Line: A vertical line of distorted loops running the length of the fabric. Caused by a damaged needle. Do Not Cut This. The seam will pucker and the line will be visible. This is a Cutting Loss. You must cut around it.
- Drop Stitch: A hole where a needle failed to catch the yarn. It leaves a visible "ladder" or run. Reject.
The 4-Point System for Knits:
For knits, the standard is slightly stricter than wovens because holes are so damaging.
- Hole > 1 inch: 4 Points.
- Continuous Needle Line: Usually counted as 4 Points per yard of length it runs.
We had a US activewear client who was cutting black supplex (nylon/spandex) for leggings. They didn't use a light table. They cut hundreds of units. When they sewed the gusset, the seamstress's machine light backlit the fabric, revealing dozens of pin holes they'd missed in cutting. The entire cut was trash. We now provide a "Light Table Inspection Certificate" with every bulk knit order over 2,000 yards. It costs us an extra $0.02 per yard in labor. It saves them $2.00 per yard in wasted garment costs. This is the standard we follow: ASTM D3882 standard test method for bow and skewness in woven and knitted fabrics (which relates to how you lay it on the light table). And for a practical look at inspection equipment, this guide to using a fabric inspection machine with backlighting for knits is a good primer.
What Finishing Specifications Must Be on the Checklist?
We've covered the fabric itself. Now we need to talk about the Surface. The finish is what gives the knit its personality. Is it silky and cool? Is it fuzzy and warm? Is it slick and water-resistant? Finishing is where a $3/yd fabric can feel like a $6/yd fabric. But finishing is also where a lot of hidden compliance issues live. You can have perfect stitch density and perfect color, but if the finish is wrong, the garment fails safety tests or feels terrible on the skin.
The two most critical finishing specs for knits—especially in the US market—are Pilling Resistance and Flammability. And I'm going to be blunt: If you are making children's sleepwear and you don't have a flammability spec on your QC checklist, you are playing Russian roulette with your business.
How to Specify Pilling Resistance for Sweater Knits?
Pilling. Those annoying little fuzz balls that form under the arms of your favorite sweater after three wears. Some pilling is inevitable with short-staple fibers like cashmere or lambswool. But excessive pilling makes a garment look old and cheap after one wash.
The problem with knit fabric is that the loops are Loose. This gives fibers room to migrate to the surface, tangle up, and form a pill. The finish we apply at the mill—usually a Bio-Polish or Enzyme Wash for cotton, or a Heat Setting for poly—can dramatically reduce this.
How to Write the QC Spec:
Don't just say "Good Pilling Resistance." That's subjective. Use the Martindale Abrasion Test standard.
"Fabric must meet ASTM D4970 / ISO 12945-2 Standard. Pilling Resistance Rating after 2,000 rubs: Grade 4 Minimum."
The Scale:
- Grade 5: No change.
- Grade 4: Slight surface fuzzing / Partially formed pills.
- Grade 3: Moderate pilling. (This is a fail for most apparel).
- Grade 1-2: Severe pilling. (Total reject).
The Finishing Fix:
If a client sends me a spec that requires Grade 4+ pilling resistance on a Viscose/Nylon Sweater Knit, I know immediately that we need to apply a Special Anti-Pilling Finish. This adds about $0.15 - $0.25 per yard to the cost. If you don't specify it, the mill will use the standard (cheaper) softener, and you'll get Grade 2 pilling. You'll be disappointed.
In 2024, we developed a new Recycled Polyester/Wool blend for a client making high-end cardigans. The initial sample pilled terribly (Grade 2). We switched to a Compact Spun Yarn (tighter twist) and added a mild resin finish. The bulk fabric hit Grade 4.5. The cost increased by 8%, but the cardigans looked new after a season of wear. That's the difference between a one-star review and a five-star review. This is the official method we use in our CNAS lab: ASTM D4970 standard test method for pilling resistance of textile fabrics using Martindale tester. And for a more accessible explanation, this guide to understanding pilling and how to prevent it in knits is helpful.
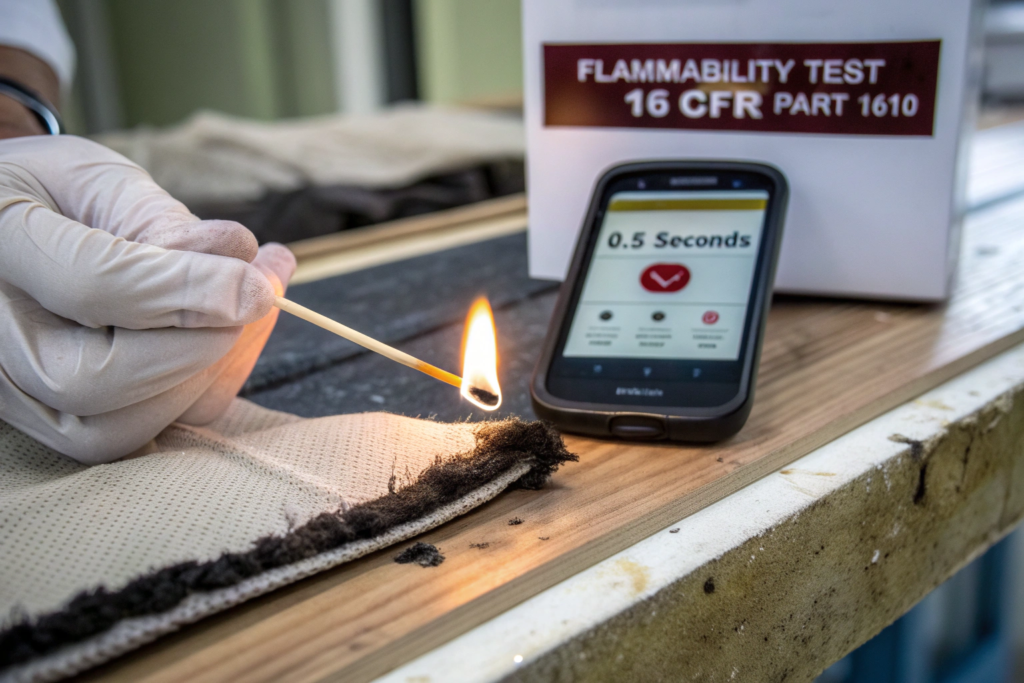
Why Is Flammability Testing Non-Negotiable for US Apparel?
I'm going to be very serious for a moment. The US has strict flammability standards. The EU does too, but the US 16 CFR Part 1610 is the law of the land. If your fabric fails this test, Customs can seize your shipment. Retailers like Nordstrom or Target will Refuse Delivery. You cannot sell it. You cannot even donate it easily.
The "Quick and Dirty" Check (For Your Own Knowledge):
Before you send fabric to a lab for the $150 official test, you can do a Burn Test in your studio to screen out the obvious fails. This is not a legal certification, but it tells you if you need to worry.
- Cut a 2" x 6" strip.
- Hold it vertically with tweezers over a non-flammable surface.
- Touch a flame to the bottom edge for 1 second.
- Observe:
- Does the flame go out immediately? (Good. Passes Class 1 likely).
- Does the flame travel up the fabric faster than 3 seconds for 5 inches? (Bad. Fails Class 3. Illegal for apparel).
- Does the fabric melt and drip burning plastic? (Very Bad. Fails. Dangerously flammable).
The Specific Danger with Knits:
- Brushed Fleece: That cozy fuzzy surface? It's Tinder. The air trapped in the brushed fibers makes it ignite instantly. This is why children's sleepwear has such strict rules (must be inherently flame resistant or Snug-Fitting).
- Rayon/Viscose: This is a cellulosic fiber. It burns like paper. It does not melt away like polyester. A rayon chenille sweater is a serious fire hazard if not treated.
I had a client making hoodies from a beautiful brushed cotton fleece. They didn't spec flammability. We tested it in-house as a courtesy. It failed Class 1 by a wide margin—the flame just ran up the fabric. We had to apply a Topical Flame Retardant (FR) Finish. This changed the hand feel slightly and added $0.50/yd. But it made the fabric legal to sell. If we hadn't caught that, they could have been sued. Always include the clause: "Fabric must comply with 16 CFR Part 1610, Class 1 Normal Flammability." This is the official source: CPSC 16 CFR Part 1610 standard for the flammability of clothing textiles. And for a practical overview of the test, this explanation of how the 45-degree flammability test works for apparel fabrics is very clear.
Conclusion
Building a quality control checklist for knit fabrics isn't about being difficult. It's about being specific. It's the difference between saying "I want a soft t-shirt fabric" and saying "I want 180 GSM Single Jersey, 95% Cotton 5% Spandex, with >94% width recovery, <5% shrinkage, and a Grade 4 Martindale pilling score." The first statement is a wish. The second statement is a Manufacturing Specification. And when you give a spec, a good mill like Shanghai Fumao can hit it. When you give a wish, you're rolling the dice.
We covered the dynamic tests—the stretch and recovery that keep a legging from bagging out. We covered the fundamental measurements—GSM weight and shrinkage that keep a polo shirt fitting true to size. And we covered the surface defects and finishes—the holes, the barre, the pilling, and the fire safety that separate a premium product from a fast-fashion throwaway. Use this checklist on your next knit order. Send it to your supplier before they cut the first yard of greige goods. If they push back or say "We don't test for that," you have your answer about whether they're the right partner.
At Shanghai Fumao, this checklist isn't extra work for us. It's how we run our floor every day. Our CNAS lab is set up precisely to verify these metrics. If you want to walk through this checklist for your next jersey, rib, or fleece program, we can help you dial in the specs before you spend a dime on production. Reach out to our Business Director, Elaine, at elaine@fumaoclothing.com. Let's make sure your next knit shipment is exactly what you spec'd, not a surprise waiting to be unrolled.