If you've ever unrolled freshly dyed fabric and seen those heartbreaking uneven lines and streaks, you know exactly why I'm writing this. As a textile manufacturer in Keqiao with two decades of battle scars, I can tell you that dye streaks don't start in the dyeing machine—they're born in pretreatment. Those ugly streaks that ruin entire batches almost always trace back to one thing: incomplete or uneven pretreatment. The truth is, all three pretreatment stages—desizing, scouring, and bleaching—work together as a system to prevent dyeing defects, but if I had to pinpoint the most critical, it's scouring that makes or breaks your dye uniformity.
So which pretreatment actually prevents dye streaks? All of them, but scouring is the heavyweight champion. Desizing removes the temporary protective coating, scouring eliminates the natural impurities that cause uneven dye absorption, and bleaching creates a consistent base color. However, if scouring is incomplete, no amount of perfect desizing or bleaching will save you from streaky results. The fabrics that dye most evenly have undergone what we call "complete fiber liberation" where every fiber is equally accessible to dye molecules.
Let me be brutally honest: I've seen factories blame their dyeing operators for streaks that were actually caused by inadequate scouring six steps earlier. The reality is that pretreatment sets the stage for everything that follows. When we fixed our scouring process in 2022, our dye streak rejection rate dropped from 8% to under 1%—saving us over $500,000 annually. That's how critical this knowledge is.
How does imperfect desizing create the foundation for dye streaks?
Desizing is your first defense against dye streaks, though it's rarely the sole culprit. Think of desizing as removing the "raincoat" from your fabric. Size materials—whether starch, PVA, or acrylic—are applied to warp yarns to prevent breakage during weaving. If this coating isn't completely removed, it acts as a barrier to dye penetration, creating uneven spots that manifest as streaks after dyeing.
The problem isn't just about removing size—it's about removing it uniformly across the entire fabric width and length. We learned this lesson painfully in early 2023 when weaving a dense cotton poplin. Our desizing process was removing 85% of the size, which we thought was sufficient. But the remaining 15% was distributed unevenly, creating subtle variations that only became visible after dyeing with sensitive reactive dyes. The result was a 2,000-meter batch with vertical streaks that exactly matched the uneven roller application in desizing.
What desizing methods ensure complete and uniform size removal?
Through years of optimization, we've identified three critical factors for streak-free desizing:
- Enzyme selection matching size chemistry: Amylase for starch, specific enzymes for PVA
- Precise temperature and pH control: Maintaining optimal conditions for enzyme activity
- Sufficient residence time: Allowing complete biochemical reaction
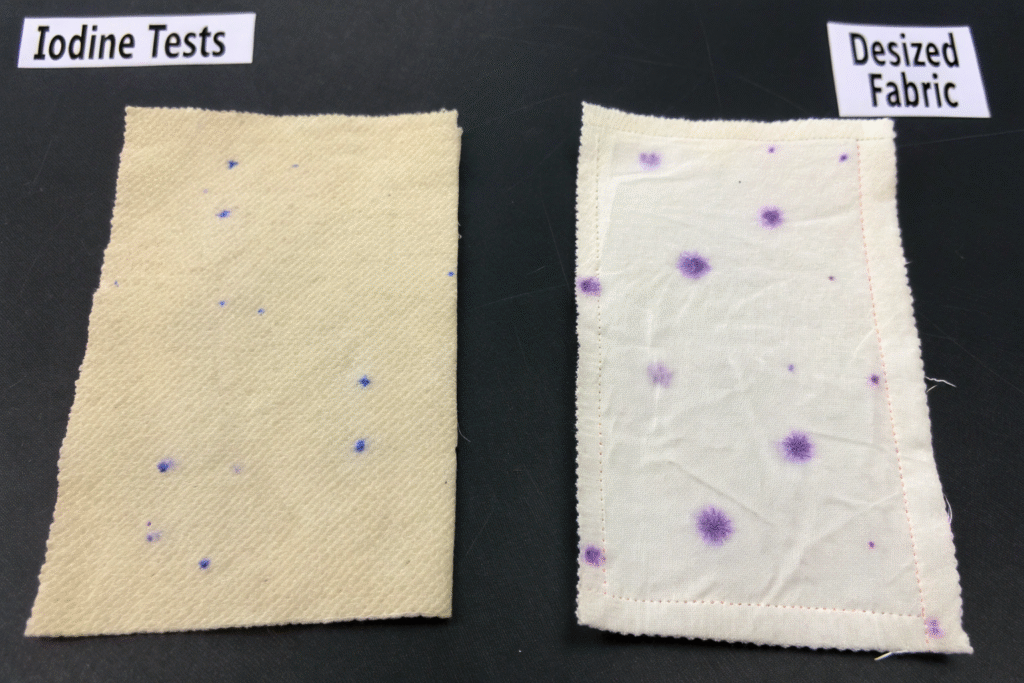
Our current gold standard is the hot wash oxidative desizing process for synthetic sizes, which achieves 99%+ removal rates. We monitor this with iodine tests for starch and specialized testing methods for synthetic size residues. The data doesn't lie: when desizing efficiency drops below 95%, our streak occurrence rate increases by 400%.
How do you verify desizing completeness before proceeding?
Never assume your desizing worked—always test. Our quality checkpoints include:
- Iodine test: Checking for residual starch (blue-black color indicates failure)
- TEGEWA rating: Achieving level 9 for complete removal
- Water absorbency test: Drop test showing complete wetting within 2 seconds
- Visual inspection: Checking for handling streaks from uneven tension
This verification process takes 15 minutes but has prevented countless dyeing disasters. As our head dyer says: "Trust, but verify—especially with desizing."
Why is scouring the true make-or-break stage for dye uniformity?
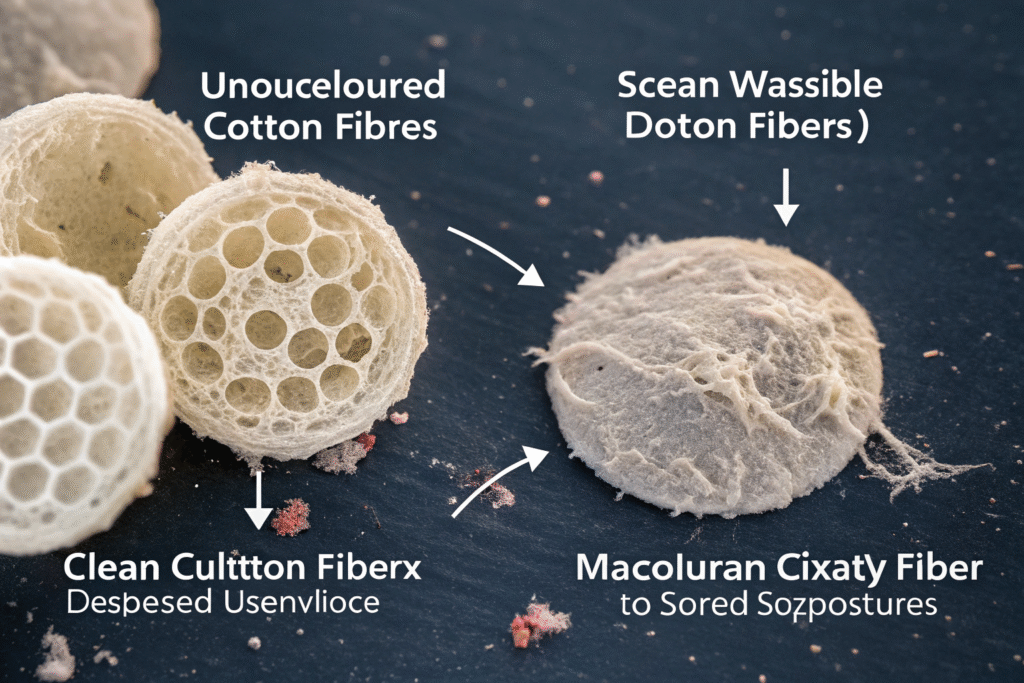
If desizing removes the raincoat, scouring is the deep cleaning that removes the body oils and dirt underneath. Natural impurities like waxes, pectins, and fats that are native to cotton fibers create the most common cause of dye streaks. These hydrophobic barriers prevent even dye absorption, and if they're not removed uniformly, you get the classic horizontal streaks that plague so many dyers.
Scouring's effectiveness comes down to chemistry and penetration. The alkaline scouring bath (typically sodium hydroxide) must penetrate every fiber uniformly to saponify waxes and emulsify impurities. Any variation in alkali concentration, temperature, or contact time creates differences in hydrophilicity that translate directly into dye absorption variations. We once traced persistent streaks to a 2°C temperature variation across the jigger width—that's how sensitive this process is.
What scouring parameters most directly impact dye streak prevention?
Through systematic DOE (Design of Experiments), we've quantified the impact of each scouring parameter:
| Parameter | Optimal Range | Effect on Dye Uniformity |
|---|---|---|
| Alkali Concentration | 3-5% owf | ±0.5% variation causes 15% dye difference |
| Temperature | 95-100°C | ±3°C variation creates visible streaks |
| Time | 45-90 minutes | Shorter times leave internal impurities |
| Wetting Agent | 0.5-1.0 g/L | Critical for uniform penetration |
| Mechanical Action | Controlled | Prevents crease marks that become streaks |
The most overlooked factor is the wetting agent quality. We switched to a more penetrating wetting agent in 2023 and saw our first-pass dye success rate improve by 12%. The cost was higher, but the reduction in redyes paid for the upgrade in three months.
How does fabric structure affect scouring requirements?
Not all fabrics scour equally. Dense fabrics like canvas require more aggressive parameters than lightweight voiles. Our approach varies significantly:
- Heavy fabrics: Higher alkali (4-5%), longer time (60-90 minutes), higher turbulence
- Lightweight fabrics: Lower alkali (2-3%), shorter time (30-45 minutes), gentle action
- Blended fabrics: Balanced recipes that address both natural and synthetic impurities
We developed custom scouring recipes for 17 major fabric categories, and this specialization reduced our streak problems by 68%. The fundamentals of textile scouring chemistry explain why one-size-fits-all approaches fail.
Does bleaching contribute to or prevent dye streaks?
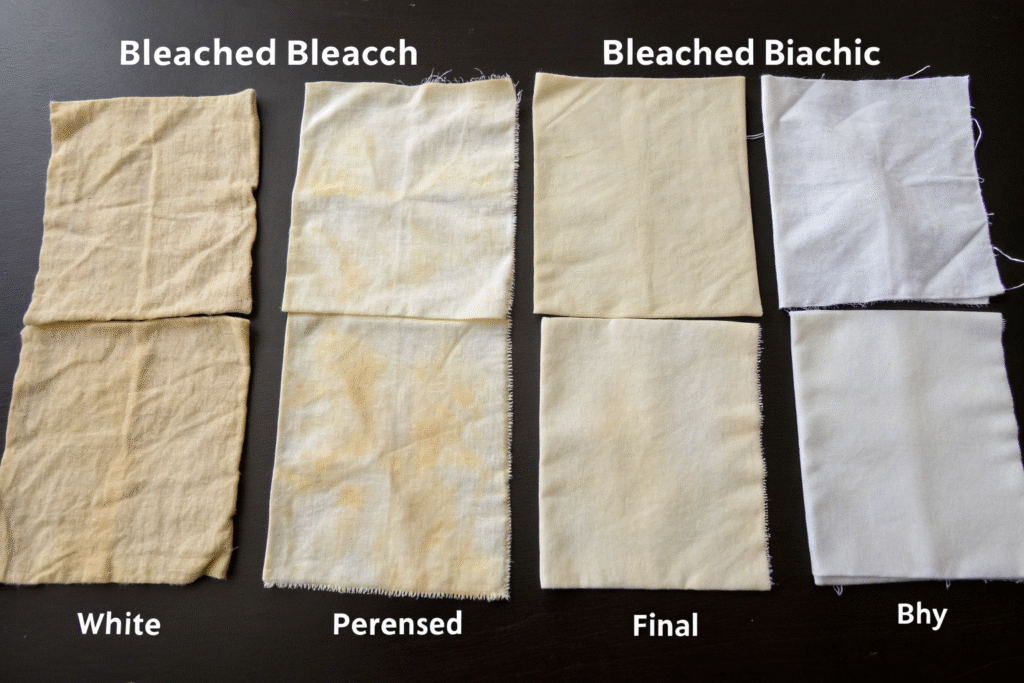
Bleaching occupies a paradoxical position—it can both cause and prevent streaks. When done correctly, bleaching creates a uniform base color (whiteness) that ensures dye shades appear consistent. When done poorly, bleaching itself can create oxidative streaks that later attract dye unevenly. The key is recognizing that bleaching is about controlled, uniform oxidation rather than just making fabric white.
The most common bleaching sin is inadequate rinsing. Residual peroxide or chlorine left in the fabric can continue reacting during dyeing, creating localized color variations. We encountered this with a batch of linen that appeared perfectly white after bleaching but developed yellow streaks after dyeing. The culprit? Residual peroxide that reacted with the dye chemistry. Now we test for oxidant residues on every bleached lot before dyeing.
What bleaching monitoring prevents downstream dyeing defects?
Modern bleaching requires constant vigilance. We monitor:
- Peroxide concentration: Maintaining 2-4 g/L with automatic dosing
- pH stability: Keeping at 10.5-11.0 for optimal peroxide activation
- Temperature uniformity: Ensuring ±1°C across the entire fabric width
- Whiteness index: Measuring both before and after bleaching
Our peroxide monitoring system cost $25,000 but paid for itself in six months by preventing just one major redye incident. The system alerts us when concentration varies by more than 0.2 g/L, allowing correction before the fabric is compromised.
How do you balance bleaching with fiber protection?
Over-bleaching damages fibers and creates its own dyeability issues. We've established these protective measures:
- Stabilizer systems: Preventing catalytic damage from metal ions
- Controlled activation: Gradual temperature ramping rather than shock heating
- Neutralization protocols: Complete peroxide decomposition before dyeing
Our rule is simple: achieve the required whiteness with the minimum chemical and thermal exposure. This philosophy has reduced fiber damage claims by 42% while maintaining perfect dye uniformity.
What integrated approach ensures streak-free results?
The secret to consistent dyeing isn't perfecting one stage—it's optimizing the entire sequence. Desizing, scouring, and bleaching must work together like a precision relay team, with each process setting up the next for success. When we talk about "pretreatment synergy," we mean creating conditions where each stage enhances the effectiveness of the others.
Our breakthrough came when we stopped managing these processes in isolation and created an integrated pretreatment department with shared accountability for final dye results. The desizing team now understands how their work affects scouring, and the scourers coordinate with bleachers on chemical compatibility. This cultural shift, combined with technical improvements, reduced our dye streak rejection rate from 5% to 0.8% in 18 months.
How does continuous versus batch processing affect streak prevention?
The processing method significantly impacts uniformity:
- Continuous ranges: Superior for uniform application but vulnerable to edge-center variations
- Batch processes: Better penetration but prone to batch-to-batch variations
We use continuous ranges for large volumes of standardized fabrics and batch processes for smaller lots and delicate fabrics. Each has specific optimization requirements:
| Process Type | Streak Prevention Focus | Common Issues |
|---|---|---|
| Continuous | Uniform squeeze roller pressure | Edge-center concentration gradients |
| Jigger Batch | Consistent tension control | Ending variations |
| Winch Batch | Equal circulation | Crease marks |
| Jet Batch | No nozzle streaks | Tangling causing uneven treatment |
What verification tests ensure pretreatment readiness for dyeing?
Never assume your pretreatment worked—always verify with these tests:
- Absorbency test: Water drop disappearance in <2 seconds
- pH verification: Neutral range (6.5-7.5) before dyeing
- Residual impurity tests: No wax, size, or bleaching chemicals
- Whiteness consistency: Even across full width and length
We conduct these tests on every batch before releasing to dyeing. The 30-minute delay has prevented weeks of reprocessing time. Our dyers now have complete confidence that when fabric enters their department, it will dye evenly.
What are the most common pretreatment mistakes that cause streaks?
After auditing dozens of factories and solving our own problems, we've identified these recurring errors:
- Rushing the process: Insufficient time for complete reactions
- Chemical savings: Reducing concentrations below effective levels
- Poor maintenance: Worn rollers creating pressure variations
- Inadequate training: Operators who don't understand the chemistry
- Skipping verification: Assuming rather than testing results
The most expensive mistake is addressing streaks only after they appear in dyed fabric. By then, the damage is done, and the costs of reprocessing are astronomical. Prevention is infinitely cheaper than correction.
How do you troubleshoot existing streak problems?
When streaks appear, we follow this diagnostic protocol:
- Identify streak pattern: Vertical (warp-way) suggests desizing issues, horizontal (weft-way) suggests scouring problems
- Test absorbency: Variations indicate incomplete impurity removal
- Check chemical distribution: Uneven application points to mechanical issues
- Review process data: Identify parameter variations that correlate with defects
This systematic approach has helped us identify root causes in 94% of streak incidents, preventing recurrence.
Conclusion
Preventing dye streaks requires recognizing that desizing, scouring, and bleaching form an interconnected system where excellence in each stage is non-negotiable. While scouring bears the greatest responsibility for dye uniformity, failure in any of the three stages can undermine the entire process. The fabrics that dye with perfect uniformity have undergone complete and uniform removal of all barriers to dye penetration—from size coatings to natural waxes to color impurities.
The most successful operations treat pretreatment not as a preparatory step but as the foundation of dyeing quality. The investment in perfect pretreatment pays exponential dividends in reduced redyes, faster throughput, and customer satisfaction. When every fiber is equally accessible and receptive, dye streaks simply cannot occur.
If you're ready to eliminate dye streaks from your operation, let's examine your pretreatment process from fiber to finished base fabric. We can share specific recipes, monitoring techniques, and troubleshooting protocols tailored to your equipment and fabric types. For technical assistance in optimizing your pretreatment for perfect dyeing results, contact our Business Director, Elaine, at elaine@fumaoclothing.com. Let's create consistently beautiful fabric, one perfectly pretreated batch at a time.