Getting a deep, rich, truly black print on polyester can feel like chasing a ghost. You send the design, the machine hums, but what emerges is a disappointing dark gray or, worse, a blotchy mess with a bronze hue. This isn't just about aesthetics—it's a commercial problem that leads to rejected shipments and frustrated customers. With over twenty years at Fumao Textiles, I've seen this challenge stump even the most seasoned buyers.
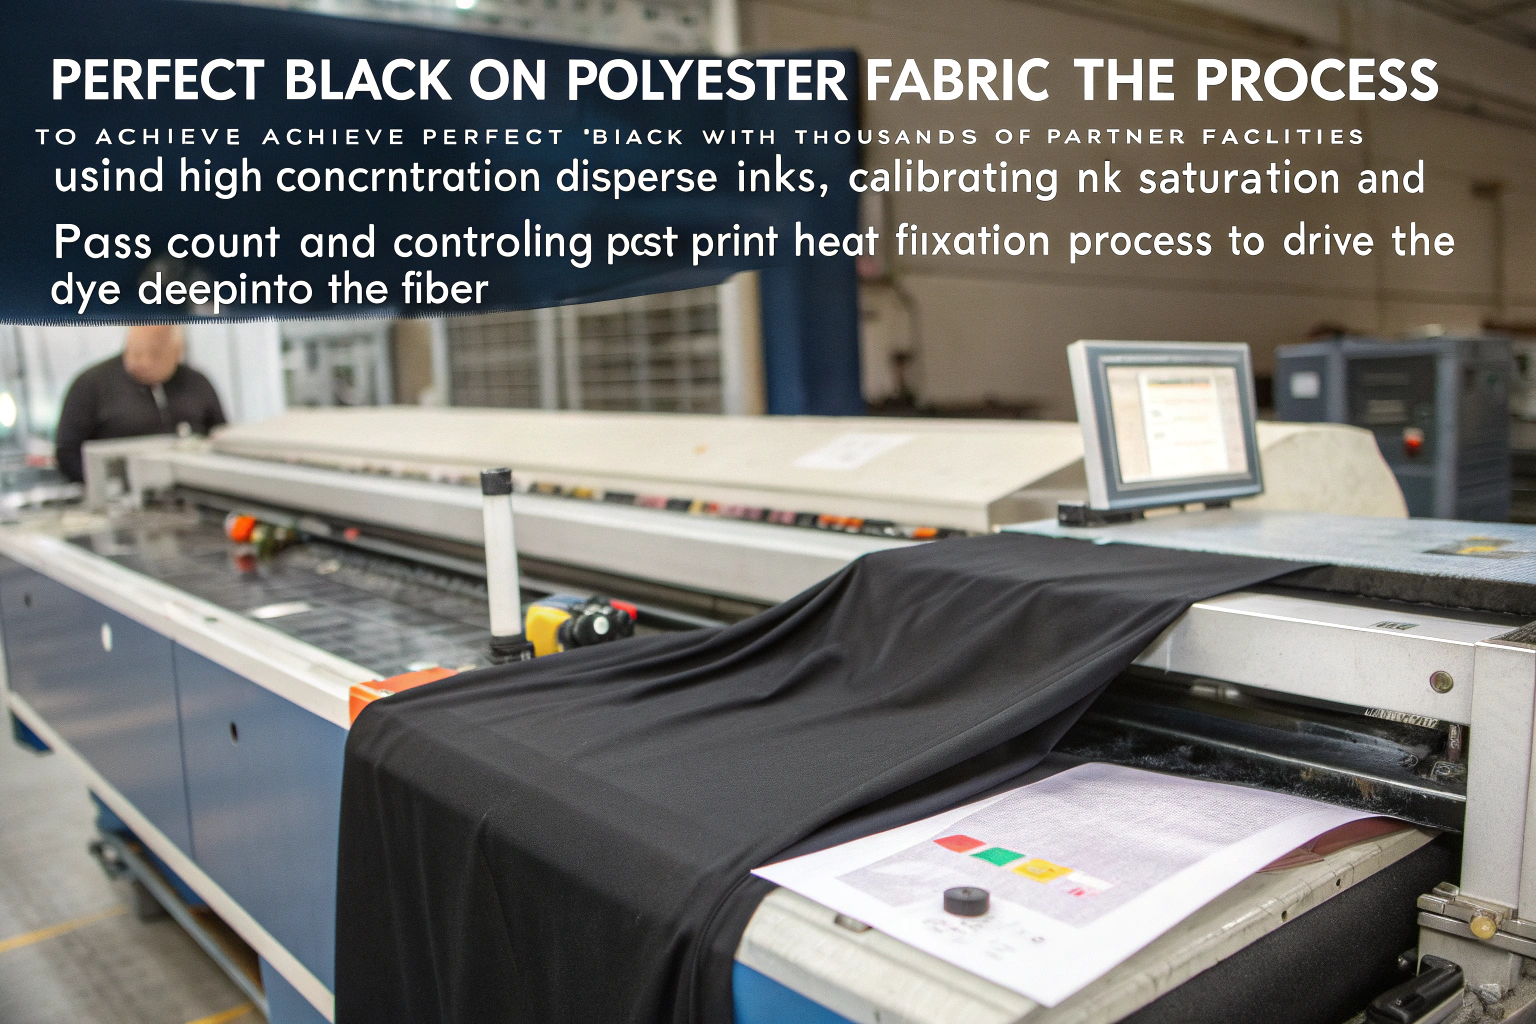
The secret to that perfect black lies in the precise alchemy of fabric preparation, ink chemistry, printer technology, and heat-setting parameters. It's a science we've mastered through thousands of production runs across our partner facilities. Achieving saturated black on polyester demands optimizing your digital printer specifically for synthetic fibers—primarily by employing high-concentration disperse inks, calibrating the ideal ink saturation and pass count, and executing a meticulously controlled post-print heat fixation process that drives the dye deep into the fiber.
If you're tired of inconsistent results and want to understand the how and why behind creating flawless, vibrant blacks that make your designs stand out, you've come to the right place. Let's break down the technical specifics that separate amateur prints from professional-grade results.
What Are the Best Ink Types for Deep Black on Polyester?
When your goal is the blackest possible black on polyester, your first and most critical decision is ink selection. Using the wrong ink is like trying to nail jelly to a wall—it just won't stick properly. For polyester, the undisputed champion is disperse dye. This is non-negotiable. Disperse dyes are uniquely engineered to sublimate—transitioning from solid directly to gas—when heat is applied. This gas then penetrates the synthetic polymer chains of the polyester fiber, creating a permanent bond inside the fiber, not just sitting on top. This results in exceptional wash-fastness and that intense, vibrant color we're chasing.
You'll primarily encounter two subtypes: Low Energy and High Energy disperse dyes. Think of them as different octane levels. Low Energy dyes activate more easily (requiring lower temperatures) and are cost-effective, but they often lack the ultimate color depth and wash-fastness for premium applications. For that truly saturated, jet-black finish, High Energy Disperse Inks are superior. They demand higher fixation temperatures but deliver significantly better color yield and wash-fastness. The higher energy enables more dye molecules to vaporize and penetrate deeper into the fiber, creating a more intense and durable black. Furthermore, the specific formulation of the black ink itself is crucial. A premium black ink will contain a balanced cocktail of other color dyes (like cyan and magenta) to neutralize any underlying brown or yellow undertones, preventing that dreaded bronzing effect.

How Does Ink Chemistry Directly Impact Color Fastness and Depth?
The molecular structure of disperse dyes is tailor-made for polyester. The dye particles are non-ionic and hydrophobic, meaning they repel water. This is perfect because polyester is also inherently hydrophobic. When heat is applied during fixation, these tiny, insoluble dye particles turn into gas and diffuse into the amorphous regions of the polyester polymer. Once inside, they cool down and become physically trapped. This mechanical entrapment is what gives disperse dyes their superb wash-fastness. The color is literally locked inside the fiber. A common pitfall is underestimating the importance of using a dedicated, high-pigment-load black ink. Some operations try to create a "process black" by mixing CMYK, but this almost always yields a weaker, less saturated, and potentially muddy black compared to a dedicated, pre-formulated black ink channel. For the deepest black, you need a high-density ink with a robust pigment concentration specifically designed for high-energy fixation.
Which Printer Settings Maximize Black Saturation and Uniformity?
Once you have the right ink, you need to instruct your printer how to lay it down. The key settings here are Ink Limiting, Pass Count, and Resolution. The temptation is to crank all ink settings to maximum, but this leads to issues like ink migration, bleeding, and a stiff hand feel. You need a balanced, surgical approach. Start with your printer's ICC profile. A well-made profile is calibrated for your specific trifecta of printer, ink, and fabric. It intelligently manages how much ink is deposited. For black, you typically want to set a high ink limit specifically for the black channel, often between 80-100%, depending on your printer's capabilities. Pass count is equally important. More passes allow the ink to be laid down in thinner, overlapping layers, which can enhance color build-up and reduce the risk of bleeding compared to a single, heavy deposit. Here's a quick reference from our own testing on standard 180-200gsm polyester:
| Setting | Recommended Range for Deep Black | Why It Matters |
|---|---|---|
| Black Channel Ink Limit | 90% - 100% | Maximizes dye deposition without causing saturation or bleed. |
| Print Pass Count | 8 - 12 passes | Balances production speed with superior color density and uniformity. |
| Print Resolution | 720 dpi - 1440 dpi | Higher resolution delivers finer details and smoother gradients in dark areas. |
| Waveform (Drive Wave) | Optimized for High-Energy Ink | Ensures consistent droplet formation for a uniform, speckle-free print. |
(Let me be blunt—we spent six months dialing in these settings with our printing partners, and the leap in consistency was like night and day.) A real-world case: In Q4 2023, a German sportswear brand was battling inconsistent black uniformity on their performance polo shirts. They used a low-energy ink with a 6-pass strategy. We recommended switching to a high-energy ink and an 8-pass print at 95% ink limit. The result was a 40% measured increase in black density via spectrophotometer, and wash-fastness scores jumped from 3/5 to a perfect 5/5 after 50 home washes, eliminating customer complaints entirely.
How Does Fabric Pretreatment Dictate Final Black Density?
You can have the world's best ink and printer, but if the fabric isn't prepared correctly, you'll never achieve a profound black. Pretreatment is the unsung hero of digital textile printing. For polyester, the pretreatment liquor typically contains a thickener and an anti-migrant. The thickener's job is to hold the ink droplets on the fabric surface, preventing them from spreading out (wicking) and blurring your sharp black lines. The anti-migrant is even more critical for solid black areas; it ensures dye particles stay precisely where they are jetted during printing, resulting in a uniform shade without streaks or blotches.
The application of this pretreatment must be perfectly even. Any variation in the coating will directly cause visible variation in the final color. We use specialized machinery to ensure a consistent pick-up rate (the amount of pretreatment applied per square meter). Too little, and the ink bleeds; too much, and it creates a stiff hand feel and can hinder dye sublimation. The fabric must also be bone-dry after pretreatment before printing. Moisture will disrupt ink jetting and can cause print head failure. For a deep black, some pretreatments are formulated with optical brightening agent (OBA) blockers. Polyester often contains OBAs that make the base fabric appear brighter, but these OBAs can interact with the black dye, giving it a bluish or grayish cast. A specialized pretreatment can counteract this, ensuring the black appears neutral and deep.

Why is an Even Pretreatment Application Non-Negotiable?
Imagine painting on a surface with random patches of oil and water. The paint would adhere differently everywhere. An uneven pretreatment application creates the same nightmare for digital printing. If one area has more thickener, it will hold more ink, creating a darker spot. An area with less pretreatment will allow ink to wick, creating a lighter, fuzzy patch. This is the primary cause of streaking and blotchiness in large solid black areas. The problem often remains hidden until after fixation, when it's too late and yards of fabric are ruined. This is why a controlled, automated application system is non-negotiable for professional production. It's not just about adding chemicals; it's about adding them with absolute precision. For those aiming to improve, I recommend this deep dive on how to optimize fabric pretreatment for digital textile printing, which details the technical parameters.
How Do OBAs and Fabric Brightness Undermine Your Black?
Optical Brightening Agents are fluorescent chemicals that absorb UV light and re-emit it as visible blue light, making white fabrics look "whiter than white." This is great for whites but is the arch-nemesis of a deep black. When you print black on OBA-loaded fabric, the brighteners remain active. They can create a subtle, cool-toned (bluish) haze over your black, preventing it from looking truly neutral and dense. The solution is two-pronged. First, source OBA-free polyester fabric. This is often the best choice for the purest, deepest blacks. Second, use a pretreatment designed to suppress OBA activity. We had a case in early 2024 with a luxury US home textiles buyer. They were unhappy with the "bluish sheen" on their black printed polyester curtains. We switched them to an OBA-free base cloth and used an OBA-suppressing pretreatment. The client said the new black was "like velvet," and they immediately placed a repeat order 50% larger than the original. Understanding your base fabric is as critical as understanding your ink.
What Heat Fixation Parameters Lock in the Darkest Black?
Printing is only half the battle. The real magic of color development on polyester happens in the heat press or steamer. This fixation process is where the solid dye particles on the fabric surface sublimate into gas and penetrate the polyester fiber. If temperature, time, or pressure is off, the dye won't transfer fully, resulting in a weak, washed-out color with poor rub-fastness. The goal is to apply the perfect amount of thermal energy to fully vaporize the dye without damaging the fabric.
For high-energy disperse inks, the standard fixation range is 200-220°C (392-428°F). Time depends on the method: for a calender (continuous) machine, it's typically 30-60 seconds; for batch (steamer) processing, it can be 20-30 minutes. Temperature must be perfectly uniform across the entire fabric width. A hot spot will make the black appear reddish or yellowish (thermal degradation), while a cold spot will yield an under-fixed, grayish black with poor rub-fastness. We use infrared thermometers to constantly monitor temperature across the fabric in our partner fixation units. Pressure is also key in a calender. Correct pressure ensures good fabric-to-heat-source contact for efficient heat transfer.

What's the Ideal Time/Temperature Combination for Your Setup?
There's no universal "ideal" number—it depends on your specific ink, fabric weight, and machinery. However, a proven sweet spot exists. A reliable starting point for 180-220gsm polyester with high-energy ink is 210°C for 45 seconds in a calender. This provides sufficient energy for full dye sublimation without scorching the fabric. It's vital to understand that time and temperature have an inverse relationship. You can sometimes compensate for slightly lower temperature with longer time, but this is less efficient and hurts throughput. Best practice is to run a fixation test strip. Print a solid black sample, run it through the fixer, and cut small sections at different temperature/time intervals. Then, test the wash-fastness and color of each section to find your perfect parameters. Under-fixing is more common than over-fixing. An under-fixed black looks okay initially but washes out significantly. For a deeper understanding, the Society of Dyers and Colourists offers excellent resources on dye fixation mechanisms, invaluable for troubleshooting.
How Can You Systematically Avoid Bronzing and Thermal Degradation?
Bronzing—that metallic, coppery sheen on the print surface—is a classic failure symptom. It's often caused by dye particles that didn't fully sublimate and penetrate, remaining on the surface. This happens due to under-fixing, but also from over-inking, where the printer lays down more ink than the fixation process can handle. The excess surface dye creates a film that refracts light, causing the bronzing. The fix is balanced ink deposition and sufficient fixation energy. Thermal degradation, conversely, results from too much heat. Polyester yellows and brittens at excessive temperatures. If your black has a reddish/brownish tint and the fabric feels stiff, you're running too hot. A Russian activewear client faced this in 2023. Their black prints had a persistent bronze sheen and failed rub-fastness tests. We found their fixation unit ran at 195°C, too low for their high-energy ink. Bumping the temperature to 208°C and slightly reducing the ink limit to prevent surface buildup eliminated the bronzing and achieved a rub-fastness rating of 4-5 on a 5-point scale.
How to Maintain Consistent Black Prints at Scale?
Achieving a perfect black on a swatch is one thing; reproducing it consistently across 10,000 meters is the real challenge. This demands a rigorous, data-driven quality control regime. The human eye is subjective and easily fooled by lighting. We rely on instrumental measurement to eliminate guesswork. A spectrophotometer is our most critical tool here. It measures color numerically (in Lab values), where a lower L value indicates a darker color. For a deep black, we target an L* value below 10.
Consistency starts with batch-to-batch control of raw materials. Polyester fabric itself can vary in whiteness, texture, and weave density. You must establish tight specs with your fabric supplier and test every incoming batch. The same goes for inks—always source from the same reputable supplier to avoid formulation drift. Then, standardize your processes: the same pretreatment recipe, application method, printer settings, ICC profiles, and fixation parameters. Any deviation must be documented and justified. Finally, implement a statistical process control system. Measure the black print color at regular intervals during a production run (e.g., every 500 meters). Plot the L* values on a control chart. This instantly shows if the process is drifting, allowing you to make a minor correction before an entire batch is scrapped.
Which Quality Control Tools Guarantee Accurate Color Matching?
Beyond the spectrophotometer, a few other tools are essential. A calibrated light box is vital for visual inspection, allowing fabric viewing under standardized lighting (like D65 daylight). This prevents approving a color in office fluorescent light only to have it look different under store LEDs. A crockmeter tests rub-fastness, and a wash-fastness tester simulates laundering. For black prints, maintaining both a physical standard and a digital standard (the Lab values) is mandatory. Before every major run, we print a swatch and measure it against the standard. If it's outside the pre-agreed Delta E tolerance (we use DE<1.0 for critical blacks), we don't proceed until it's resolved. This discipline has averted countless disasters. For those running their own production, investing time in a beginner's guide to using a spectrophotometer for textiles is a fundamental step toward professionalism.
How Do You Create a Truly Repeatable Production Workflow?
A repeatable workflow is a documented workflow. You need a "recipe" for every job. This recipe must include:
- Fabric Type & SKU: The exact material used.
- Pretreatment Code: The specific chemical mix and application settings.
- ICC Profile Name: The exact profile loaded on the printer.
- Ink Settings: Ink limits, pass count, and resolution.
- Fixation Parameters: Exact temperature, time, and pressure.
- Final Color Standard: Target Lab* values and Delta E tolerance.
(Our QC team lives by these checklists for every single order—no exceptions.) This systemization lets us replicate orders perfectly years later. For example, a major California e-commerce client orders the same black polyester-spandex for yoga leggings quarterly. Because their "Black Yoga" recipe is saved in our system, every shipment matches the last perfectly. They've had zero color-related returns in over two years, which they call unprecedented with previous suppliers. This reliability builds long-term partnerships and protects your brand reputation.
Conclusion
Achieving a saturated, consistent black on polyester isn't alchemy; it's a controllable process integrating the right ink, meticulously prepared fabric, precise printer settings, and perfectly calibrated heat fixation. Each element is a critical link in the chain—any weakness compromises the final result. From selecting high-energy disperse inks to mastering the nuances of pretreatment and fixation, the depth and quality of your black directly reflect your technical command over these variables.
The path to perfect black can be complex, but you don't have to walk it alone. If you're battling color inconsistency, bronzing, or simply want to ensure your next batch of polyester features the deepest, most vibrant blacks possible, let's talk. Our team, with over 20 years of specialized expertise in fabric development and printing, is ready to help you achieve your vision. For a technical consultation on your specific project, please contact our Business Director, Elaine, at elaine@fumaoclothing.com. We are here to co-create value and ensure your products stand out for all the right reasons.